Download PDF here – Exercise 1 Intermediate head tilt exercise complete
Skill Level: Intermediate
What: Quick sketch a fast template for the head and neck at any tilt, turn, tip, angle, elevation
How:
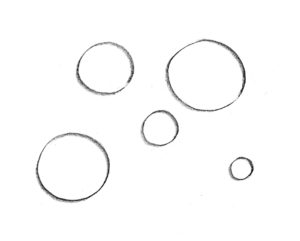
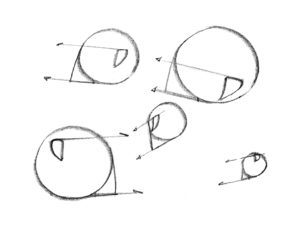
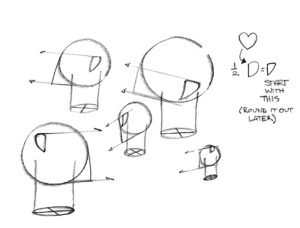
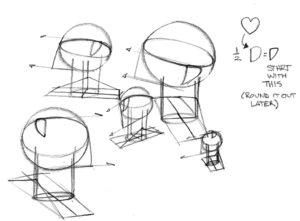
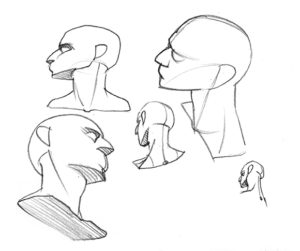
Start with a circle, drawing many at several assorted sizes. Inside of each circle draw half a heart that will represent the ear, like the example here, with all the edges more angular at first than circular to get a sense of the angle the shape sits within the circle. The top of this ear shape will coordinate with the top and bottom edges of the skull shape.
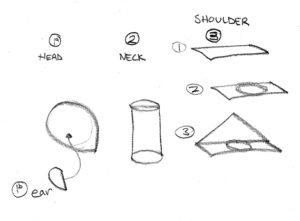

With the ear in place, draw a triangle connected to the circle with the bottom edge parallel with the top edge of the ear shape. This should create a strong silhouette of a skull/head shape.
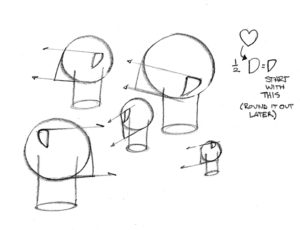
With the bottom edge of the paper acting as the direction for the ground plane, draw necks under each of these skulls to strengthen the concept of the tilt. Each neck should be two parallel lines ending with an ellipse to close off the bottom of the neck container.
Draw a line directly through the short axis of this bottom ellipse. Draw a line across the long axis of the neck opening. These axis lines will vary depending upon how you want the skull to be turned between the shoulders.
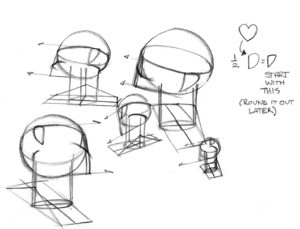
Extend the center axis line beyond the neck cylinder on either side. The line should not be any longer than 2-3 of these head/skull widths.
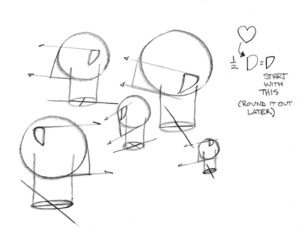
Using the axis lines of the neck, draw a box around the extended axis line to frame it. This is the top plane of the shoulders.

Extend the center lines of the front and back of neck up through the neck cylinder crossing through the skull. These lines represent the front center and back center of the neck cylinder. The c7 resides at the intersection on the back of the neck, the pit of the neck and the manubrium are the intersection of the front of this cylinder.
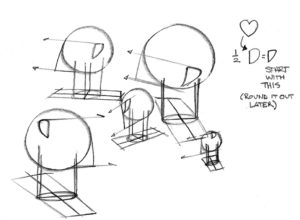
Draw angles from the two back corners of the shoulder box to the center line of the back of the neck, with both lines intersecting each other. This is the coat hangar shape that represents the shoulder line.
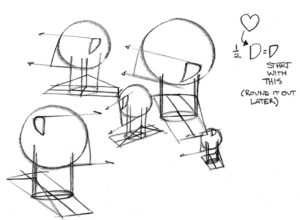
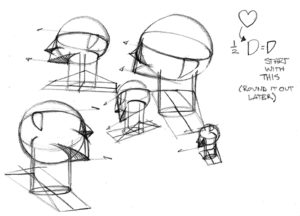
Draw a line around(ellipse) the skull shape using the top of the ear as the axis for the ellipse. This line represents the axis of the eye brows.
Draw a center line down the middle of the face. Draw a triangle on the face plane that intersects this centerline. Extrude the center line between this triangle at the bottom to the desired distance for the shape of the nose.
 Connect the center line to both corners to draw the bottom triangle or base plane of the nose. Do this with the chin at this time, keeping the plane of the chin and the plane of the nose similar in tilt.
Draw in the tooth barrel leaving space for a chin.
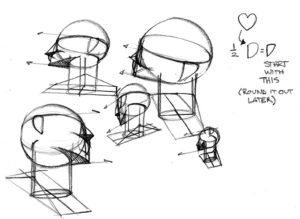
For each head you draw, it should take no more than 45 seconds to a minute for each.
A Weekly Workout
Here is a weekly routine to maintain for a lengthy duration, until you feel comfortable with the practice, and you can reflexively copy images without too much struggle. Give it at least 2 constant weeks before it feels intuitive.
Day 1: 30 Minutes – 3 Pages with at least 12-16 different sized heads on the page (invented). Go slow at first to figure out the method and order to the shapes. Draw as much as you see in the examples on this page. NO DETAILS! Speed up as you feel comfortable with the pacing and the shapes are not too far out of character for what they are, i.e. your circles don’t look like footballs, etc.
Day 2: 30 Minutes – 4 Pages with at least 12 – 16 different sized heads on the page (invented). Draw as much as you see in the examples on this page. NO DETAILS! For the first page go at a reasonable pace. For the second page speed things up, and for the last two pages move quickly and use reference. You will find that slow down occurs when you have to interpret something but will eventually speed back up once the connection with the shapes occurs.
Day 3: 20-30 Minutes – 5 Pages with 12 – 16 different sized heads and necks on it. The first two pages should be from reference, the last 3 invented. Reversing the order this time will do something different to the way the invented heads are approached, a new level of perception is discovered because of the heightened awareness of the common perspective clues that all the features share with each other. The time is possibly shortened due to your confidence with the skill. Draw as much as you see in the examples on this page. NO DETAILS!
Day 4: 30 Minutes – 5 Pages with 12 different sized heads and necks, this time using different genders, draw one page of male heads, and draw one page female heads and attempt to stylize the shape language you are using to capture some of the qualities in the faces you copy. The prior 3 days was just a routine of standard shapes, but now, can you push the shapes just a little, into the look and feel of the person copied? Instead of a circle, it ends up more egg like, or kinda squarish, because the reference “feels” that way. The last 3 pages are all invented and anything goes with gender.
Day 5: 30 – 45 minutes – 2 Pages with 7 – 9 different heads on it, but with these, take them farther, identify features, shade a little, differentiate the local values, give it a little life. Do not concern yourself with finishing any of them, just develop them further than the previous days of exercise.
Take 2 days off, repeat but add 1 page per each week you repeat. Challenge yourself to push these skills into intuitive long term memory tools.
Why:
The goal is to learn how to react to the reference and build quick and effective shapes with an understanding of elevation, tip, turn, tilt, etc. of the skull drawn, and a quick response to the primary foundation shapes to build upon.
This exercise is to develop:
- An intuitive reflex and understanding for the head/skull tilt, tip, turn of a reference
- Organic Perspective and overlapping forms become easier to grasp and design
- A solid sketch tool for developing quick ideas related to head gesture
- Intersecting shapes to form a new complex shape/form